Saturday, August 20, 2016

Um... ok, so it's been awhile.

Again.

I have a good excuse this time - it was my last few semesters of college (3.75 gpa, whoo hoo!), and immediately after graduation, I moved!

And it wasn't your every-day, run of the mill local move.  Nope, not this girl.  I packed everything I could in and on the car, and took off for Colorado.

I went from this..


To this...


Elevation of 600 feet, to 6,000 feet. 

I've been here for three months now, and it's taken about that long to get really acclimated to the higher altitude.  Lasts weekend I was up around 10,000 feet, and it didn't bother me much at all.

Why Colorado?

Why, indeed!


The Colorado photos were taken by me on various road trips.  There will be many more as Autumn turns the aspens to gold, and the first flakes of snow dust the mountaintops.  Stay tuned!

Sunday, March 8, 2015

On making macarons....

I found myself needing a project.  Not a short-term, done in a few hours type of work.  I wanted something that would build on itself, a skill.  Hmm.... French cooking!  (How do I come up with this stuff?)

In researching and planning my vacation to Europe, I came across several mentions of this delightful French cookie called a macaron.  Not a macaroon, mind you, which is a delightfully chewy coconut cookie.  Non!  These are light-as-air creations, pretty as can be.  And I have never (until a few weeks ago) had one, yet knew I had to make them!  So I hustled down to the local Central Market, and purchased two from the patisserie.  They were scrumptious!  At $1.89 each, and no bigger than a half-dollar, they had better be... and that's where the challenge began.

Macarons have a bad reputation.

They get their bad rep because it's been said they are very difficult, temperamental - caprecieux, if you will.  Recipes conflict each other across the board - let the egg whites rest for 24 hours, it doesn't matter.  Don't make them on a rainy/hot/cold day, it doesn't matter.  It's enough to make you throw your hands up in the air and exclaim Mon Dieu!  What have I gotten myself into?

All my research led me to a delightful blog called Brave Tart - a talented young baker named Stella created this blog, and it is famous for its section on macarons.  See the recipe HERE.  She has several pages on just how to create this fanastique French favorite.

I gave it a whirl myself, and now I'm hooked.  Let me tell you my story about how I made macarons...

First, the ingredients!

Don't mind the orange, I thought I would be able to make two different batches.  I made one kind, almond cookie with raspberry jam filling.


Measure carefully!  I found a nifty little kitchen scale at the thrift store for $2.  Go by weight, not volume.  Factors such as humidity, or how a product was stored, can affect volume.  This is the almond flour (also called almond meal).  I found this little gravy ladle is perfect for scooping stuff out of a bag and into the measuring cup.


Same with the sugar - weight, not volume.


The instructions said to blend the sugar and almond together with a rubber spatula.  Ok, I had a big one... somewhere... but I could only find this little one!  I have since remedied that problem!


More measuring... I want to find a piece of plastic to glue to the top of the scale, the little base is just not big enough!  I have to be very careful, or it will tip over.  Don't ask how I know this.


This is why you add eggs to a bowl first, not the batch of ingredients!


Set a timer!  A lot of recipes call for a stand mixer, but I don't have one (yet).  Hand-held electric beaters work fine.  You will do this for quite some time, at least 9 minutes.  Just when you think the egg whites and sugar won't come together, they do!  Be patient!


This is after 9 minutes of beating on high, and adding the gel color.  Don't use the liquid, it'll just not work.  Gel colors are $1.79 at WalMart, and a little goes a long, long way!


Finally!  Very stiff peaks is the goal!


Folding in the almond/sugar mixture.  Keep folding, not beating.  You want it to be lava-like, where it will hold a shape, and not run all over.  I think I didn't fold enough, and that was a problem later on.


Ok, so my piping technique needs work.  Next time I'm going to use a cheat-sheet - a sheet of parchment with circles drawn on it underneath, so each cookie is the same size.  Also, see the tops?  My meringue was just a little too stiff.  A few more folds would have corrected this.


Not bad for a first-time try.  The cracks could have been solved by letting the pan rest for 20 minutes before baking.


With a schmear of raspberry preserves!


They may not have looked perfect, but they sure tasted good!  And they're even better the next day!

So much for my first try at macarons.  I'm going to try again, and this time I want to try blood orange, with blood orange buttercream filling.  

What is the most challenging recipe you've ever attempted?


Friday, January 9, 2015

It's cold outside.

No, really.  To us Texans, 35 is cold.  Anything below freezing, and we hunker down inside by the fire.  My son is in Minnesota.  Right now, anything above freezing is shorts and t-shirt weather.

Then again, along about August, if it falls below 90, we throw an extra blanket on the bed, and get out a jacket!

Winter weather means winter food.  And winter food, to me, is easy food.  Stew, soup, chili - dump it in a pot, and in an hour or so, you have a hearty and delicious meal.  And because all that stewing can tenderize a not-so-tender cut of meat, it can be very economical as well. So I thought I'd post some photos and - well, not a recipe per se, but more of a "how-I-did-it" in case anyone wants to try their hand at making these yummy concoctions!

Recently I had a nasty cold.  That calls for the old standby, chicken soup.  Jewish penicillin if you will.  Chicken breast, corn, green beans, carrots, a bay leaf or two, and broth, with some parsley, salt, and pepper.  Let it cook.


Sometimes I get a hankering for beef stew, but even stew beef is pricey these days.  Nothing wrong with burger stew!  Brown the burger, add carrots, potatoes, onions, whatever other veggies, bay, and seasoning.  Not the best photo, but you get the idea.


Tonight's creation is turkey chowder.  The local grocer had turkeys for $,49 an pound - such a steal!  So the wings, thighs, and legs went to simmer with bay, onion, garlic, salt and pepper.  Once the meat was falling off the bone, I scooped it out, and separated it, being sure to save some for the pups, and I drained the stock into a large bowl.  Chop up about a half pound of lean bacon, potatoes, carrots, onion... whatever else you like, I added corn and green beans - then 1.5 cups of half and half, and enough stock to cover.  A little parsley and pepper, then let that pot of goodness simmer until the potatoes are done.  Winter goodness!  

Sometimes if it seems a little thin, I'll add a slurry of cornstarch and water, and let that bubble up for a few minutes,  Not much - just enough to give it a little extra "body."


Finally, you can't talk about hearty winter food without mentioning a big bowl of red.  Good ol' chili.  Whether you make it from scratch, or cheat a little and doctor up a can of Wolf Brand (more ground beef, cumin, garlic, onion, and spicy to your taste), there's nothing like it on a cold evening.  Add shredded cheddar and a big dollop of sour cream, and let your saltine cracker dive in!

What's your favorite winter meal?


Friday, December 5, 2014

Sewing....and a pattern review

I have been on the hunt for the perfect tunic pattern for months - nay, years!  I love the look of a soft tunic with coordinating leggings.  I can wear the look to work and you know what?  It's the closest thing to being in my pajamas, and still looking presentable!

So when I glanced at the New Look pattern rack at my local Walmart a few weeks ago, lo and behold, New Look 6323 jumped up and said "Hey!  Here I am!"  Since wally world discounts patterns, for $2.99 it was worth a shot.

The cut of this tunic is simple, it flows nicely over the body - like love, it covers a multitude of sins! (1Peter 4:8)  The pattern works well with any knit fabric - I've made three of them so far, with a 4th waiting to be cut out in the morning!  I made size XL as the pattern runs, and it fits more like a 1x.  The arms are a little long, but I like it that way, and better too long than not enough!  It takes less than two hours to create a top.  I've made the leggings out of a heavier cotton/poly/spandex blend - they fit more like a pant than a super-snug legging, but that's ok too.

Here's the pattern...


The first tunic I made, I used the neckband.  Ugh, what a pain that was!  And for me, the neckline was a little low.  So I changed the neckline to use a facing instead, and raised it about 1.5".  I'll make another adjustment on this next one, and that is to bring in the back neckline a little bit, it's kind of wide.  All versions so far are the longer hemline, v-neckline, and long sleeves.

I don't have a photo of the first tunic, and it's in the laundry right now, I'll get one tomorrow...

The second tunic was made from a kitten-soft silvery gray and black velour - not a whole lot of stretch to it, and because of that the arms are a little snug.  Looks incredible with black leggings and boots.  A silvery gray scarf finishes the look.


Oh and look, I made earrings to match!  Dark gray, light gray, and white pearls, and crystal AB beads.

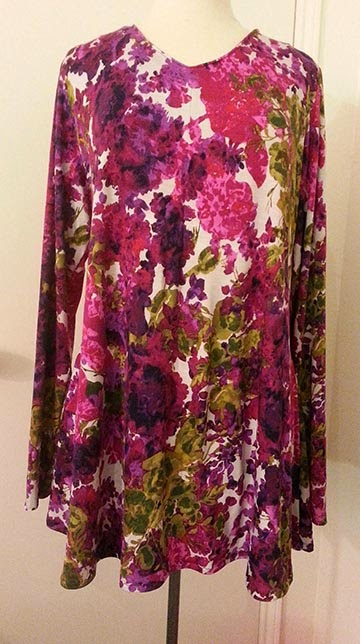
Next is a delightful rayon/poly blend, sooo soft (I have this thing for softness!) and very stretchy.  Found it on sale at Joann's for like $5 a yard.

And yes I made matching earrings, but no photo... I'll edit in the morning.  I also made the leggings out of a heavier knit that matches the darkest purple.  I could also wear this with gray, black, or dark olive.  And I have enough of the print fabric left over for an infinity scarf!

Another pattern I'm working with is Vogue 8691.  I'm using a black and turquoise lace over a solid turquoise knit.  I'm a little bogged down with this, as it's like making 2 shirts... but that's another post!


I have another fabric upstairs in the sewing room that is just itching to be cut out in the New Look pattern - but that's still another blog post!

I'll leave you with these words of wisdom - measure twice three times, cut once!  The first set of measurements are your own.  The second set of measurements are the pattern - measure edge to edge and remove seam allowance from each piece - so if underarm to underarm on the front pattern piece is 22", and you want a half-inch seam allowance, that will have a finished width of 21".  The third set of measurements are the actual garment measurements.  Patterns don't always run true to their size chart, so measure, measure, measure!

What pattern is your favorite, that you make time and time again?

Saturday, November 8, 2014

In the sewing room...

So I've started doing a little of what might be called "selfish sewing" - that means I'm making something just for me, not for someone else, for sale, whatever.  And it's nothing fancy, but I'm pretty pleased with the results.

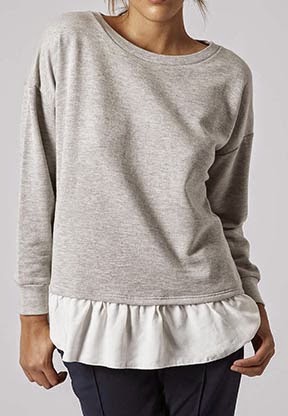
Doing some window shopping on Net-a-Porter, I came across this shirt, and really liked the idea of the ruffle peeking out from the bottom.


Not so much the price tag!  I think it was around $50 or so, and I just can't see that.  So the creative juices started flowing, and here's what I started with:


A length of pretty chiffon and a thrifted long-sleeve tee.  Chiffon I think was less than $5 a yard, and the tee was $2.  So I'm in it for $7 so far.

My first step is to measure the hem of the tee.  Remember, it stretches, and you'll use that stretch later.  After measuring, I added about 12" to the number, allowing 6" of stretch for front and 6" for the back.  You'll see why.


I figured I wanted about 3" of print showing under the shirt.  I could have gone wider, this was just a number I thought would work nicely.  Take in to account the inch or so from the bottom of the tee to the hem stitching, and a tiny bit that will be serged off.  Cut a band DOUBLE that.  So 3" to show, and 1"-ish for hem, and I cut an 8" wide section of chiffon.  You can tear it also, that way you are straight on the grain.  (Note - depending on your yardage, you may need to sew two pieces together to make one long band, that's what I had to do.  Just make sure the pieces are even for front and back.)


Then fold it in half, WRONG sides together!  You can press it if you like.  Pin together.  Notice the seam line, this was because my length of chiffon wasn't long enough to go around my wide butt the hem of the tee.  Just make sure they're two equal lengths for front and back, you'll see in a sec.


Handy with a serger?  Then you can probably skip pins.  If not, remember to REMOVE the pins before you get to the mechanism!


Now it's time to pin!  Place the serged edge along the hem on the inside of the tee.  If you used two sections of chiffon, make sure seams meet.


You will have more band than tee.  The way I did this was 1) pin each side seam.  Stretch to where the tee is the same as the band and 2) pin the center.  Then 3) pin halfway between the side and center... and so on.

Clear as mud?  Lookey here.


As you sew the band, you're going to gently stretch the tee to take up the slack.  And this is easy, because you have the twin-needle hem stitching as a guide, just stitch right in the middle of the two.  Slowly.  Really.


And that's it!  I also made a matching infinity scarf (that's my next tutorial) and wore the outfit to church the next morning.  Compliments all around!  Any questions, let me know and I'll answer the best I can.  Maybe a version in lace next?


Sunday, July 20, 2014

Refinishing furniture... not as easy as it looks!

So I have some nice furniture pieces that I obtained many years ago - very nice quality.  But after kids, dogs, country life... it all took a toll on the lovely finish.  So to go along with my French Country feel, I decided to paint and then wipe stain on it for an antique-y vibe.

Other bloggers make it look EASY.  It's NOT.  It takes time, and lots of it.  I spent at least 8 hours on this one piece.  That doesn't include the trips to Hobby Lobby for the fixture, or Home Depot for the drill bit.  And it was hard work!  But I think it paid off.

I followed this blog entry, over at Sweet Pickins - How I Glaze Furniture. The one thing I did differently is not put the stain in the glaze, I just wiped the stain on the cabinet.  I have a matching coffee table to work on as well, and I'll definitely add the glaze.  You have to work really fast with just stain.

Let's have some pictures!

This is the cabinet/side table/end table/whateveryouwannacallit before - sorry for the bad photos, they're all from my phone... and choosing a piece with beaded board in the front and back was probably not the best choice for a first-time project, but I'm happy with it!

Let's do a light sanding, although the paint I used, Behr Premium Plus, really didn't require it.
After sanding, wipe it down with a damp rage - I used a chunk of an old t-shirt.

This is the paint color - sort of a light vanilla, called "Innocent."

Let's get it started!

I used two coats.  The first coat was not very smooth, kind of blotchy, but that's ok.  Second coat pretty much covered everything.

Now the staining part - no photos, because my hands were in rubber gloves, and I had to work very quickly in the short time between wiping it on and rubbing it off.  Hint:  Be careful where you sand for distressing.  If you sand over the paint, like on a flat part, your stain will catch in there.  Be sure you have straight lines!  I used Minwax Jacobean - the same stuff I used on the basket from a few weeks ago.

Here is the difference between painted, and stained.

Time to add the new fixture - the original was just a plain wooden knob.  I think this one adds more character, and it was half off!  Also notice how I made sure the stain was kind of "puddled" at the bottom, because that's where dirt and stuff would be if this were an older piece.


Finally, about 2 pm Sunday afternoon, after starting around 11 Saturday morning, I'm done!  I love the hardware, and think it will make a very pretty place for... hmm... not sure.  Maybe the tv will go on top of it.


What do you think?


Saturday, July 12, 2014

Back from the fabric outlets....

...and my feet hurt!  I was in and out of every outlet store in Dallas (off Harry Hines and Perth Street) for what seemed like - wait, it was - hours.  Finally, at the new location of Wherehouse Fabrics (where Best Fabrics was, til they moved across the street) I found it!  A lovely tan-based jacquard with a floral print.  And 25% off!  As an aside, I found a nice rug for the living room too!

Here's the rug and soon-to-be curtains.


I also picked up a few pieces of chiffon - I'm going to try my hand at making some scarves!


So... yeah, tomorrow I'm going to tackle the curtains.  Updates as they happen!